The evening comprised of the Annual General Meeting and the April Competition. The meeting followed the usual format with reports from the existing officers and thanks from the chairman to all of the people that have helped during the year with teas, setting up equipment and cleaning up after meetings. The treasurer’s report was positive showing that the club was in a good financial position at present. Membership shows an upward trend which will help the club in the near future. We will know better the current membership once the subscriptions have been collected.
The subscription issue was discussed with proposals for an increase in the yearly subscription to £12.00 OR to remain as it is at £10.00. The motion to remain at £10.00 was carried by a majority. Subscriptions are therefore now due and are payable on the door over the course of the next few meetings.
The subject of committee members and club officers was raised and all of the current committee were happy to continue with their post except that the Quartermaster post held temporarily by Clive Bryant was now open. A vote to retain the committee was undertaken and carried unanimously.
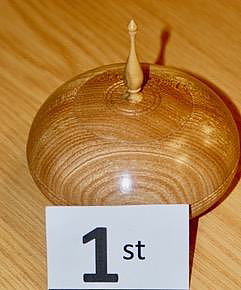
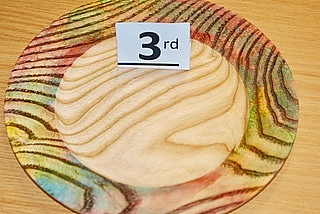
The April competition was a little better represented with the standard still high. The top three pieces will automatically be entered onto the stand at Woodworks in May. Once we have the photo’s they will be published.
The turner of the year also featured here which is where the whole years competition results are compiled and points awarded for placement and entry. The overall winner was Mick Denton. The challenge is now on for someone to depose him of his crown this time next year.
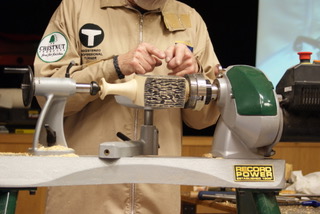
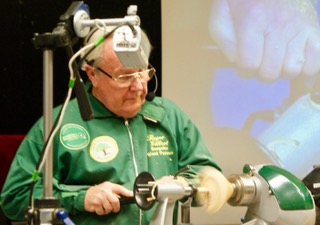
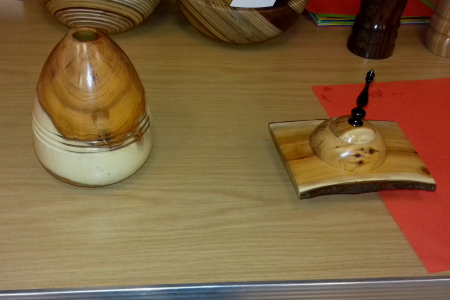
The evening was a demonstration by Steve Heeley who introduced the project as a means of utilising square or rectangular offcuts to make a vase for silk flowers which included texturing and colouring.
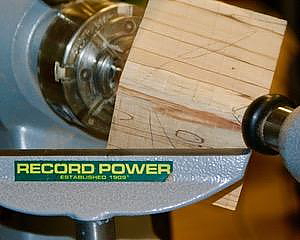
The rectangular block of pine was mounted between centres as accurately as possible.
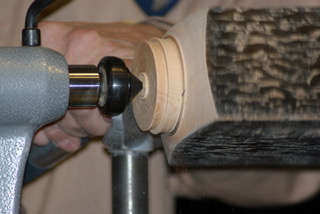
One of the faces had 3 holes drilled for fitting plugs later on. A chucking spigot was turned at the tailstock end using a spindle gouge as a parting tool may damage the square edges. This was then mounted in a chuck with the tailstock brought up for support. The neck and shoulder were turned using a spindle gouge with the final cuts being light and continuous to get the best finish.
The neck was refined with a skew again to obtain the best finish. The base shoulder was cut in the same way. The hole along the centre of the vase was drilled and the top was blended into the hole.
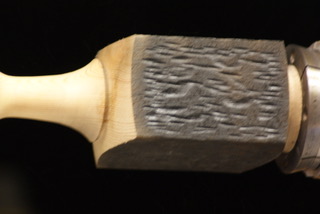
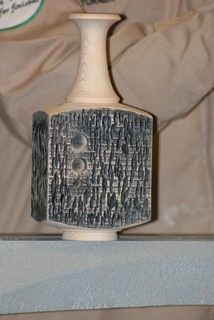
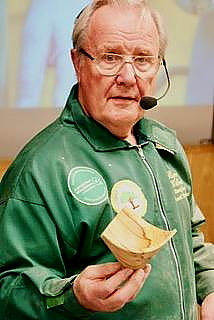
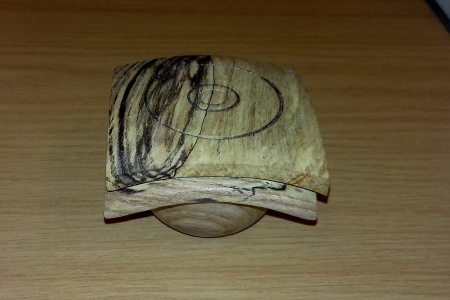
The flat surfaces were then textured quite coarsely and randomly but you could do this in any way you wish. The neck and shoulders were then sprayed with sanding sealer and the flat faces were then sprayed with Chestnut black lacquer.
Once this was dry the pommels and neck had a final skim to a fine finish and sanded. The flat faces were lightly sanded to remove the black lacquer from the high spots.
This created a striking finish of black with light wood showing through. The vase was reverse chucked onto a wooden jam chuck with the tailstock to support it. The base pommel was finished and the chucking point turned away.
3 plugs were turned and fitted into the 3 holes on the flat face as additional decoration. The vase can be finished to your choice using oil or spray clear lacquer etc. This was a really good way of using up offcuts that would usually end up as firewood and looked very effective as a finished item.
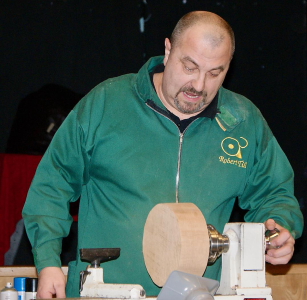
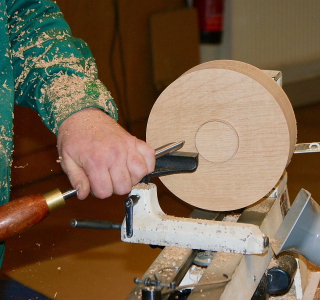
Tonight Roger Gilbert set up for 2 projects both based around bowls with a common theme of “propeller turning”. This is where the bowl is not round so you are “cutting air” for a large proportion of tile. It can be scary stuff so it is important to make sure your fingers etc are behind the tool rest and not in the line of the spinning wood.
The first bowl was a 3 cornered piece which is made by mounting an accurately cut cube of wood from point to point between centres (see photo).
The bottom was turned to finish and a chucking spigot created. The outside was sanded to a finish and the bowl rechucked on the spigot. The centre was then hollowed out but to make sure the wall thickness was accurate the toolrest was marked at the limit of your cut.
Sanding to a finish was done as power sanding and the points done with the lathe stopped. The bowl was then reversed onto a wooden former with the tailstock in place so that the spigot could be turned away. Roger’s hobby horse is that the base should always be finished so that the chucking point cannot be seen.
The second project was a natural edge Ash bowl where half a log was mounted on pin jaws in a chuck and the turning undertaken in the same was as for the first project. However, instead of a spigot for rechucking Roger used a recess on this bowl. The trick is to try to preserve the bark on the bowl but in this instance a large chunk of bark flew off. All was not lost, Roger suggested that the rest of the bark could be picked off and the natural edge scorched as a feature.
The 2 projects certainly produced interesting bowls that were a little out of the ordinary, and although not finished to Rogers usual standard looked amazing. This was another excellent demonstration with plenty of tips that we can employ on our turnings.
The March competition was a little disappointing in the turnout although the quality was as good as usual.
The evening was a hands on, however, there was only one lathe in use. Glyn Jennings had a go at a natural edge bowl then started a natural edge pot which drew quite a bit of attention from the members.
We also built the stand that will be used at Woodworks this year and several useful suggestions were made for improving the look of it. These are being worked on over the next couple of weeks and then we can see what the results look like.
The Vicmarc lathe that had failed the PAT test was also modified and is now ready for retest so that should put us back up to full strength on the equipment front.
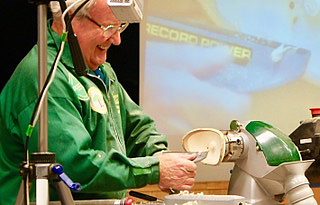
For this evenings demonstration we welcomed Robert Till who introduced his projects both of which were based on a discus form rocking bowl. The first was to be painted black and gilt waxed and the second was to be coloured with Chestnut spirit stain.
An Oak bowl blank was mounted on a screw chuck which allowed Robert to true up the edge and faces and cut a tenon.
A pencil line was made midway along the edge which would be used to define the discuss shape. The bottom of the bowl was shaped out using a pull cut and then finished using a shear scraping cut with the toolrest dropped right down to get the angle on the tool and the lathe speed increased.
Keep the tool traverse slow to give the tool time to cut. The bowl would be sanded from 120 grit to 600 grit wiping off the dust between each grit and the bowl reversed onto the chuck using the tenon. With a little bit of juggling the bowl ran true on the pencil centre line. The top of the bowl was shaped in the same way as the bottom making sure the curve looked the same. This was sanded 120 to 600 grit and the dust wiped away. The top was sprayed black with Chestnut Ebonising Lacquer and dried using a hot air gun. Gilt cream was rubbed over the black area using his finger and allowed to dry a little. The excess would have been wiped off using Finishing Oil so that only the pores are left filled with the wax. Normally the bowl would be left to dry but for this demo Robert turned out the bowl with an undercut. A great couple of tips here was to use the shaping of the top of the bowl to practice the colour on. If you do not like it you can turn it off an d try something else. Also with the hollowing of the bowl use each cut as a practice cut to pick up the bevel without a catch.
The finish Robert uses is 6 to 8 coats of Finishing Oil
each allowed to dry thoroughly and denibbed with webrax between each coat.
Although not fully completed the bowl was passed round
and looked really striking.
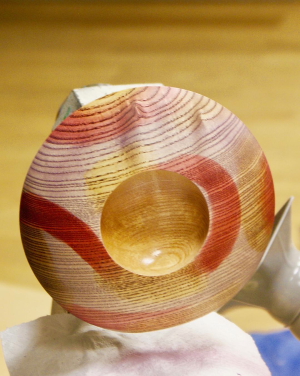
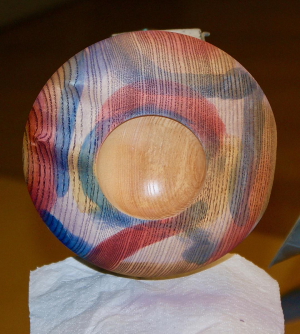
For the coloured bowl Robert produced an Ash bowl that was completed to the colouring stage in exactly the same way as he worked the Oak bowl. The colouring was done on the lathe and consisted of a base coat of purple which was dried off then sanded back so that the colour became a background. Make sure you use fresh areas of the abrasive as it clogs with the lacquers in the stain. He then applied red, yellow, blue and green “smears” and using Robert’s words it looked like a child had coloured it.
He then used methylated spirit on a tissue to blend the colours. More coulours can be added until your artistic talents decide that enough is enough.
Once dry the surface would be denibbed and then sprayed with Acrylic Sanding Sealer. The bowl was then reversed onto a wooden form with a felt pad and the tenon turned away. As this is a rocking bowl the base was turned to a curve. One tip that came from the audience was if you can get an old wet suit this can be cut up to make the pad on the wooden form. The oil finish would really make the colours sing.
This was a very inspirational demonstration and gave us
many tips that we can use on other projects.
At the end of the evening Robert donated one of his
finished bowls to the club for us to raffle or auction to raise funds for the
club. We are very grateful to him for this generous gift.
We also had the February Competition and the results were
as follows.
First A Birch Burr Bowl by Marcus Buck (unfortunately Marcus had to leave before we could get a photo)
Second An Ash Platter by Gerald Hubbard
Third A
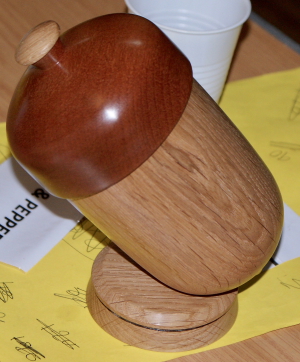
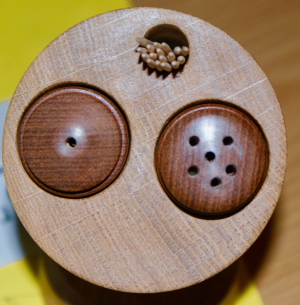
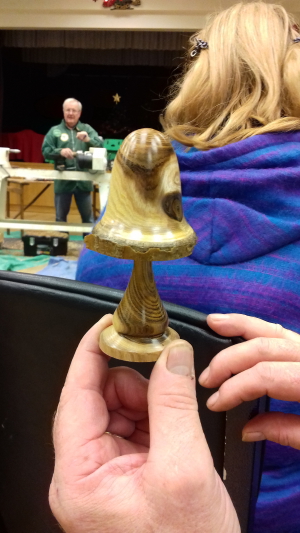
Salt, Pepper and Toothpick Acorn by Clive Bryant
The evening was a hands on with a couple of lathes in operation plus a sharpening station. Roger Gilbert worked on a square bowl in what looked like spalted birch which provided many of us with an insight into “propeller” turning. Roger fielded many questions on the subject plus others about the use of a skew chisel and other gouges. Glyn Jennings worked on the other lathe and showed the use of carbide tipped tools for hollowing etc. This drew strong interest and again Glyn answered a number of questions about this. Mick Denton ran a sharpening demonstration which was also well attended with many questions arising. As an event this proved to be very sociable and of great interest to all there, especially to our newer members.
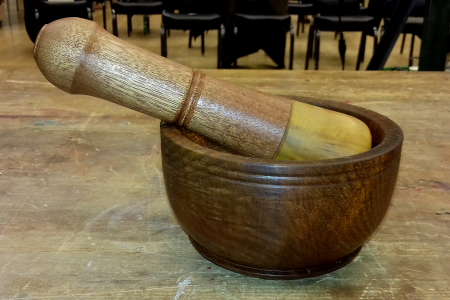
An excellent turnout for this Three Musketeers demonstration which was the first for 2019. Between them they decided to do a “time trial”. The theme was their own interpretation of a pestle and mortar but both must be completed in 35 minutes. Adrian Finch volunteered to do the timing and provide much of the heckling.
Roger Gilbert started the evening off making the bowl which, due to it’s application, has to be a thick section. The turning of the bowl highlighted the importance of making sure the blank is well held in the chuck as on this occasion the bowl fell to the floor during the hollowing process. (Roger took a bit of stick from some of the audience for that one). The pestle looks effectively like a small cosh. The pestle in this part of the demo was a 2 part piece with the business end being a piece of boxwood glued to a sapele handle.
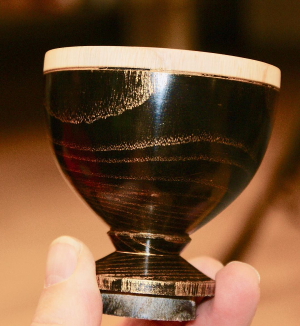
Gerald Hubbard stepped up to the lathe for the next take on a pestle and mortar and took a slightly different interpretation. This was based on a historical apothecaries / doctors mortar which is quite small but quite intricate. Mind you the heckler at the back of the room suggested it was an egg cup.
The final demonstrator was Mick Denton who took on a more standard form for the pestle and mortar.
All 3 demonstrators kept within the 35 minutes and overall the night was a success with quite a few tricks and tips offered.
The January competition was also run and in 3rd position was Bob Green with a pair of Plywood Bowls.
In a fairly rare occurrence there were joint winners of the second place. A yew vase by Ken Garratt and a yew box by Mick Denton.
The winner for the month was a square lipped box by Gerald Hubbard.
The night should have been a hands on with a social event with “nibbles”. It actually ended up as an ad-hoc three musketeers demonstration but still with the social event. Mick Denton undertook a nice goblet made from Padouk which showed the very different colouring between the heart and sap wood.
Roger Gilbert made a long thin stemmed goblet from Alder, and a mushroom and a mini snowman from Laburnum.
Gerald Hubbard a small box also from Laburnum.
Overall this was a really nice light hearted social evening and was enjoyed by all who attended. Many thanks to all of those who brought along food for the table it was very enjoyable.
Tonight was a new twist on the 3 Musketeers format of demonstrations where instead of all 3 working at the same time they each did a 40 minute demo on a specific subject.
Mick Denton started with a demonstration on sharpening. He showed the setup that he uses and the jig to set the table angle. He had made a number of jigs that were free to take if you wished (or make a donation to club funds). He also showed the setup for fingernail profile gouge grinds. Mick also showed the use of a diamond card as a means of sharpening / quick touch up between grinds.
Roger Gilbert picked up on the art of finishing, from basic abrasive work to standard finishes that he uses. His main tip for the sanding process is not to skimp on the abrasive. Dull abrasives are a false economy as you need to apply more pressure making the finished surface inferior. It is important to get the absolutely best surface before you apply a finish, take your time to get it right. He demonstrated getting a good surface straight off the tool as this reduces the time spent on sanding.
Roger went on to demonstrate and explaining the application of sanding sealer, Ebonising Lacquer and gilt cream, friction polish, food safe oil and wax.
Gerald Hubbard showed that the basic turning of a Christmas decoration complete with finials could be done in a reasonably short space of time. The body was drilled and countersunk so that it could be mounted on a pen mandrel. This was turned to a basic shape but when you make this you can make any shape, just let your imagination run riot. The top and bottom finials were turned at the same time from one pen blank.
It seemed that most of the audience picked up some snippets of useful information. It is difficult to incorporate all of these into this review, all of this just proves that you need to be at the meetings as there are so many tips that will only be valuable to you.
The December competition table was loaded with really excellent projects. First Prize went to Geoff Warr with an open barley twist table lamp. Second prize was Clive Bryant with a Taurus shaped vase and wooden flowers and third was Gerald Hubbard’s Christmas decorations.
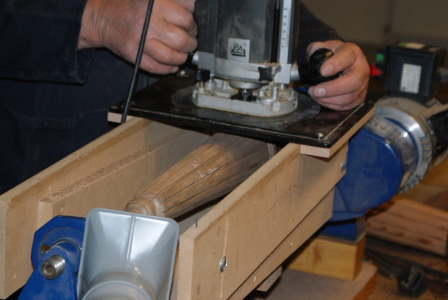
Bob Walder introduced his evening’s demonstration as the routing of flutes to a turned conical piece as an embellishment.
Bob had already mounted the router box on the lathe and the piece was set between centres. The basic setup for the jig was finalised and an indexing arm set so that 12 flutes could be made. An initial flute was routed to part depth and checked to make sure it was ok. The remaining flutes were routed to the same depth using the indexer to lock the position.
Set up
Index arm
Once this was completed the router depth was reset to make another cut.
Routing the flute
Usually Bob would make several passess to achieve the full depth but in this case he set to full depth in one go as time was a factor. Each of the flutes was cut in turn on the same index positions.
Backed off
Once completed the piece would be sanded through the grits along the grain, not with the lathe running.
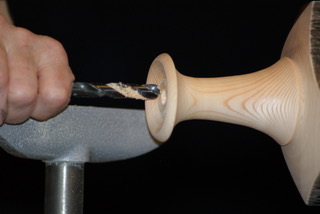
Flutes
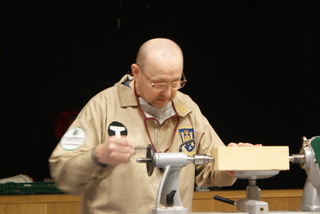
The base is a turned disc but needs a deep hole drilled into the centre for the flex. Bob showed us his set up for doing this and the long drill that he uses and he very kindly donated one of these drills to the club. A really good insight into how these sort of problems can be overcome relatively easily.
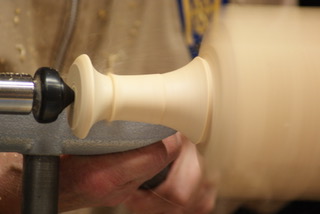
Finished piece
The demonstration showed us that with a little ingenuity and thought you can add routed detail to your pieces using a relatively straight forward jig. The effect you can achieve would be well worth the effort.


 This was turned to a basic shape but when you make this you can make any shape, just let your imagination run riot. The top and bottom finials were turned at the same time from one pen blank.